
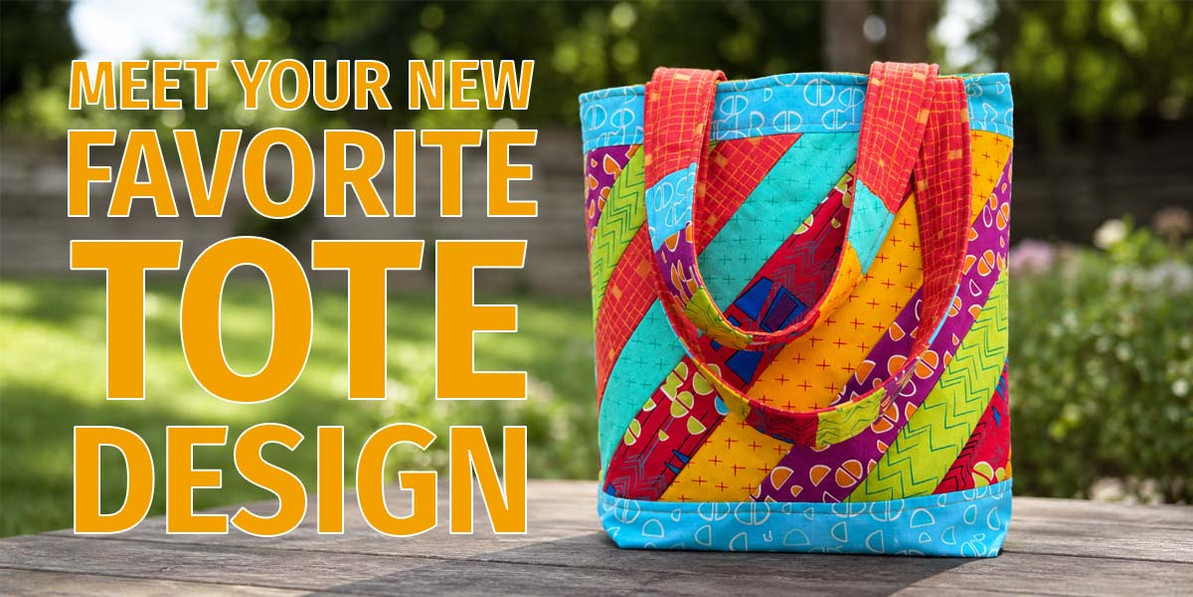
Your New Favorite Tote!
Quilt-As-You-Go Sewing Tutorial
Make a Scrappy Quilt-As-You-Go Tote Bag with Fat Quarters
Key Takeaways: Use six or seven fat quarters to piece and quilt a colorful tote bag at the same time. This quilt-as-you-go method creates a sturdy, professional-looking bag while helping you use a fun assortment of coordinating fabric prints.
In case you were wondering, QAYG means quilt as you go. Instead of piecing the entire project and quilting it afterward, the fabric strips are sewn directly onto the batting. You are piecing and quilting the tote at the same time, which helps speed up the process and creates a neat, finished result.
This tote is simple to sew and has a cheerful, scrappy look because it is made with a variety of fat quarters. Its roomy size makes it perfect for summer adventures, sewing supplies, library books, shopping trips, or an everyday carryall.

Jump to a Section
Choosing Fabric for Your Scrappy Tote
This project is a great way to feature a coordinating fat quarter bundle. The variety of colors and prints gives the quilted center panels their playful, scrappy appearance while keeping the finished bag cohesive.
The tote shown in this tutorial was made with the Modern Marks 7-Piece Fat Quarter Bundle , a cheerful collection of bright, summery prints.

Prefer a different color palette? Browse all available fat quarter bundles to find a combination that fits your style.
Find the Perfect Fabrics for Your Tote
Choose six or seven coordinating fat quarters to create your own colorful combination.
What You’ll Need
| Supply | Amount or Details |
|---|---|
| Fat quarters | 6–7 coordinating fat quarters |
| Batting | Enough for two 14" × 15" rectangles and two 2" × 20" strips |
| Coordinating thread | Choose a solid or variegated thread that complements your fabrics |
| Fabric marking tool | A removable fabric marking pen or pencil |
| Basic sewing supplies | Sewing machine, rotary cutter, cutting mat, ruler, pins or clips, iron, and ironing surface |
For the sample tote, Madeira Cotona Coral Fish variegated thread was used to complement the colorful fabric prints.
Need batting for your project? Consider cotton-poly batting in a convenient craft size .
Cutting Instructions
From the Fat Quarters
- Choose two fabrics for the lining. Cut one 13" × 14" rectangle from each fabric.
- Choose one fabric for the top and bottom sections of the tote panels. Cut two 5" × 14" pieces and two 2" × 14" pieces.
- Choose one fabric for the handles. Cut four 2½" × 20" strips.
- From each fat quarter, cut two or three 2" × 14" strips from each fabric.
From the Batting
- Cut two 14" × 15" rectangles.
- Cut two 2" × 20" strips.
Before you begin: Read through all the instructions before cutting. Keep the pieces for the lining, tote borders, handles, and quilted center strips organized as you work.
Make the Quilt-As-You-Go Tote Panels
Step 1: Mark the Batting
Place one 14" × 15" batting rectangle in front of you with a 14" edge at the top.
Measure 2½" down from the top edge and draw a horizontal line. Measure 8" down from that first line and draw a second horizontal line.
Using the 45-degree marking on your ruler, draw a diagonal line across the center section between the two horizontal lines. This diagonal line will guide the placement of your first fabric strips.

Step 2: Add the First Two Strips
Select two 2" × 14" fabric strips. Place the strips right sides together on the batting, aligning their raw edges with the marked diagonal line.
Make sure both strips extend beyond the two horizontal lines. Stitch through the fabric strips and batting using a ¼" seam allowance. Open the strips and press them flat.

Step 3: Continue Adding Fabric Strips
Add another fabric strip to the exposed raw edge of each of the first two strips. Place each new strip right sides together with the previous strip, stitch through the fabric and batting, and press it open.
Before sewing, check that each strip will extend beyond the marked horizontal lines after it is stitched and flipped open.

Step 4: Cover the Center Section
Continue adding strips to both sides until the batting between the two horizontal lines is completely covered.
Shorter strips may be used as you approach the outside edges. Just make sure every strip extends far enough to cover the marked center section.

Step 5: Add the Bottom Tote Section
Use a ruler to mark a straight line along the bottom edge of the pieced section. Check that no raw strip edges are visible above this line.
Position one 5" × 14" fabric piece along the line, right sides together, with the fabric extending upward over the pieced section. Pin and stitch through all the layers.
Press the fabric down to form the bottom section of the tote panel. Topstitch ¼" from the seam for extra security and a polished finish.

Step 6: Add the Top Tote Section
Measure 8¼" up from the seam connecting the pieced section to the bottom fabric. Confirm that no exposed raw edges extend above this measurement, and draw a straight line.
Position one 2" × 14" fabric piece on the marked line, right sides together, with the fabric extending down over the pieced section. Stitch directly on the line, then press the fabric upward.
Measure the completed pieced center. It should be approximately 8" tall. Make a note if your measurement differs, because the second tote panel must match the first.
Topstitch ¼" from the seam.

Tip: Record the height and placement of the center pieced area before making your second panel. Matching these measurements will help the strip design align at the side seams.
Step 7: Trim and Repeat
Trim the side edges of the completed panel so it measures 13" wide. Trim the top and bottom so the panel measures 14" tall.
Repeat Steps 1–7 to make a second quilted tote panel.
Before trimming the second panel, place it beside the first and compare the placement of the top border, pieced center, and bottom section. Make any necessary adjustments so the two panels align.

Make It Colorful, Coordinated, or Completely Scrappy
Mix prints from a coordinated bundle or combine favorite fat quarters from your fabric collection.
Make the Tote Handles
Step 8: Sew the Handles
Layer two 2½" × 20" fabric strips right sides together. Place one 2" × 20" batting strip on top.
Stitch along both long sides, catching the edge of the batting within the seams. Turn the handle right side out and press it flat.
Topstitch along both long edges, then square up the short ends. Repeat to make the second handle.

Optional scrappy handles: Piece together smaller fabric sections before assembling the handles for an even more colorful look.
The accompanying video provides additional guidance for making the pieced handle option.

Assemble the Tote Bag
Step 9: Sew the Outer Tote
Place the two quilted outer panels right sides together, matching the raw edges and aligning the pieced sections.
Stitch along both side edges and the bottom edge. Leave the top open.
Cut a 2" square from each bottom corner.

Step 10: Box the Bottom Corners
Open one cut corner and bring the side seam and bottom seam together. Match the seams carefully and flatten the opening into a straight line.
Pin or clip the open edges, then sew across the opening. Repeat on the opposite corner.

Step 11: Sew the Lining
Place the two 13" × 14" lining rectangles right sides together.
Sew along both side edges and the bottom edge, but leave an opening approximately 6" wide in the bottom seam for turning the bag later.
Cut 2" squares from the two bottom corners and box the corners using the same method described in Step 10.
Step 12: Attach the Handles
Turn the quilted outer tote right side out.
Position one end of a handle along the top raw edge of the tote, measuring 2" in from the side seam. Position the other end of the same handle 2" in from the opposite side seam.
Make sure the handle is not twisted. Baste both ends to the top edge of the tote.
Repeat on the opposite side with the second handle.

Step 13: Join the Tote and Lining
Keep the outer tote right side out and the lining wrong side out.
Tuck the outer tote inside the lining so the right sides are facing each other. The handles should be sandwiched between the tote and lining.
Match the side seams and align the raw edges around the top opening. Pin or clip around the entire top edge, then stitch all the way around.

Step 14: Turn and Finish the Tote
Carefully turn the entire bag right side out through the opening in the bottom of the lining.
Fold the raw edges of the lining opening inward and stitch the opening closed by machine or by hand.
Tuck the lining inside the outer tote. Press the top edge neatly, then topstitch around the entire opening for a crisp, finished look.
Your quilt-as-you-go tote bag is complete!

Make a Tote That Is Uniquely Yours
Choose a bright bundle, a seasonal collection, or a group of favorite prints and turn them into a useful handmade tote.
Quilt-As-You-Go Tote Bag FAQ
What does quilt as you go mean?
Quilt as you go means the fabric is pieced and quilted to the batting during the same process. In this project, each fabric strip is stitched directly onto the batting, so the tote panels are already quilted when the piecing is finished.
How many fat quarters do I need for this tote?
You will need approximately six or seven fat quarters. More fat quarters make for a scrappier tote with greater fabric variety.
Can I use fabric scraps instead of fat quarters?
Yes. This is a scrap-friendly project as long as the pieces are large enough to create the required strips, lining rectangles, border pieces, and handles.
What type of batting works best?
A low- to medium-loft cotton or cotton-poly batting works well. It should provide enough structure for the tote without becoming too bulky at the seams.
Why do the two quilted panels need to match?
Matching the height and placement of the pieced center sections helps the fabric strips and border seams align when the front and back panels are sewn together.
Where can I find coordinating fat quarter bundles?
Browse the fat quarter bundle selection at Sit n’ Sew Fabrics for coordinated fabric collections in a variety of colors and styles.
Recent Posts
-
Machine Embroidery Needles: Sizes, Types & How to Choose
Machine Embroidery Needle Guide Machine Embroidery Needles Explained: Sizes, Points & How to Cho …Sep 10th 2026 -
Scrappy Pumpkin Patch Wall Quilt Tutorial with 5" Squares
Free Fall Quilt Tutorial Scrappy Pumpkin Patch Wall Quilt Tutorial with 5" Squares Key Takeaways: …Sep 2nd 2026 -
12 Spooky-Cute Designs & Projects to Stitch
Halloween Embroidery Inspiration 12 Halloween Embroidery Ideas for Spooky-Cute Projects Key Takea …Aug 10th 2026