
Scrappy Pumpkin Patch Wall Quilt Tutorial with 5" Squares
Free Fall Quilt Tutorial
Scrappy Pumpkin Patch Wall Quilt Tutorial with 5" Squares
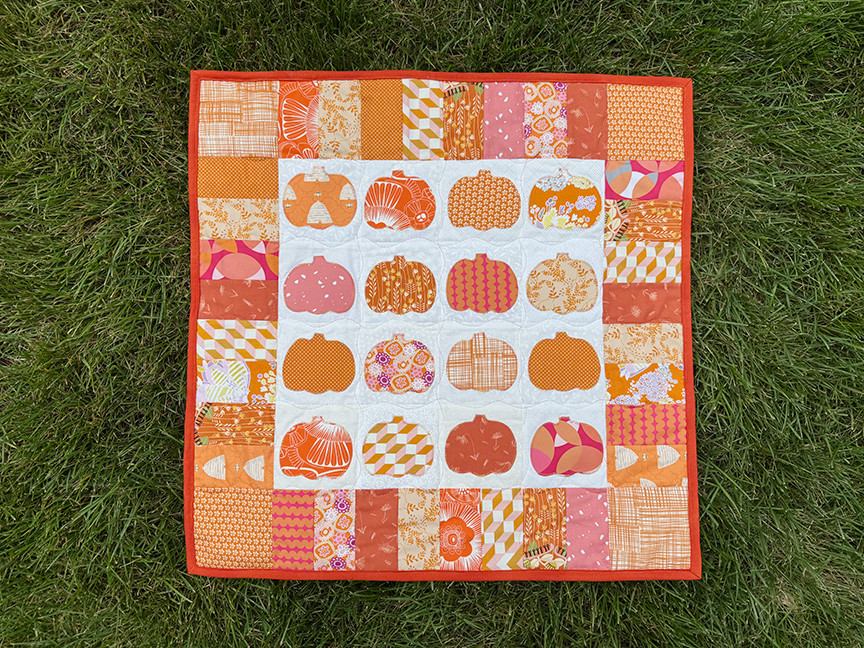
Key Takeaways: Turn orange and white 5" fabric squares into a cheerful 24" square pumpkin wall quilt. This beginner-friendly project combines fusible applique, simple zigzag stitching, and scrappy pieced borders.
If September has you in a fall-decorating mood, we have you covered! Follow this step-by-step tutorial to create a Scrappy Pumpkin Patch wall quilt filled with warm color and playful personality.
Using 5" Squares gives every pumpkin and border a whimsical, scrappy look. No two pumpkins need to match—and that is part of the fun.

Jump to a Section
Supplies and Finished Size
Finished quilt size: Approximately 24" square
| Supply | Amount and Details |
|---|---|
| Orange 5" Squares | One mixed orange 5" square pack |
| White 5" Squares | One mixed white 5" square pack |
| Binding Fabric | 1/3 yard |
| Backing Fabric | 3/4 yard |
| Batting | One 27" square; shop cotton/poly batting |
| Fusible Web | Enough for 16 pumpkin applique shapes |
| Lightweight Fusible Interfacing | Sixteen 4-1/2" squares |
| Coordinating Thread | Madeira Cotona 30 Sunset variegated thread or another coordinating thread |
Pattern download: CLICK HERE TO DOWNLOAD THE PATTERN

So much fun variety in the 5" square packs!
Build Your Own Scrappy Pumpkin Patch
Start with a colorful mix of orange and white 5" Squares, then make every pumpkin uniquely yours.
Cutting Instructions
From the orange 5" Squares, cut:
- (4) 4-1/2" squares
- (32) 2-1/2" x 5" rectangles
- Reserve the remaining orange squares for pumpkin appliques.
From the white 5" Squares:
- Reserve (16) squares for the pumpkin block backgrounds.
From the binding fabric, cut:
- (3) 2-1/4" x width-of-fabric (WOF) strips
From the lightweight fusible interfacing, cut:
- (16) 4-1/2" squares
Make the Pumpkin Blocks
Step 1: Trace the Pumpkins
Trace (16) pumpkin shapes onto the paper side of the fusible web. Cut around each shape approximately 1/2" beyond the drawn line.

Step 2: Fuse the Shapes
Following the fusible web manufacturer’s instructions, fuse one pumpkin shape to the wrong side of each orange 5" square selected for applique.

Step 3: Cut Out the Pumpkins
Cut out each pumpkin directly on the drawn line. Remove the paper backing when you are ready to position the appliques.

Here is the finished group of scrappy pumpkins—each one has its own mix of color and print.

Step 4: Build the Applique Blocks
Center and fuse one pumpkin onto each white 5" square. Then fuse one 4-1/2" interfacing square to the wrong side of each white square.

Step 5: Stitch Around Each Pumpkin
Using coordinating thread—we used Madeira Cotona 30 Sunset variegated thread—sew a zigzag stitch around each pumpkin edge. This secures the applique and adds a decorative finish.

Tip: Use an open-toe sewing foot so you can clearly see the applique edge while stitching around the curves.

Step 6: Trim the Blocks
Centering the pumpkin as you trim, square each block to 4-1/2". Make a total of (16) pumpkin blocks.

Assemble and Finish the Quilt
Step 1: Arrange the Pumpkin Blocks
Lay out the (16) pumpkin blocks in (4) rows of (4). Rotate or rearrange the blocks until the colors and prints feel evenly distributed.

Step 2: Sew the Quilt Center
Sew the pumpkin blocks into rows. Press the seams in alternating directions from one row to the next, following the green arrows in the photo. This helps the seams nest when you join the rows. Sew the rows together to complete the quilt center.

Step 3: Make the Pieced Borders
Sew (8) orange 2-1/2" x 5" rectangles together along their long edges to make one border row. Repeat to make (4) pieced border rows total. Trim 1/2" from the height of each row so every border measures 4-1/2" x 16-1/2".

Step 4: Add the Borders
Sew one pieced border row to opposite sides of the quilt center. Sew one 4-1/2" orange square to both ends of each remaining border row, then sew those rows to the top and bottom of the quilt center.

Tip: Match the seams in each pieced border to the pumpkin block seams before sewing. Pinning at those intersections will help everything stay aligned.

Step 5: Quilt and Bind
Layer the quilt top, batting, and backing, then baste the layers together. Quilt as desired. Join the (3) 2-1/4" x WOF binding strips and use them to bind the quilt.
Give your finished pumpkin patch a place of honor on a wall, entry table, or quilt ladder—and enjoy a little handmade fall color all season long!

Ready to Stitch Some Fall Fun?
Choose your favorite orange and white 5" Squares and start your own one-of-a-kind pumpkin patch.
Scrappy Pumpkin Patch FAQ
What size is the finished Scrappy Pumpkin Patch quilt?
The finished wall quilt measures approximately 24" square.
Can a beginner make this pumpkin wall quilt?
Yes. The project uses straightforward fusible applique, zigzag stitching, simple block assembly, and pieced borders. Read your fusible web instructions before beginning and take your time when stitching the curved pumpkin edges.
Do I need fusible interfacing and fusible web?
Yes, they serve different purposes. Fusible web adheres each orange pumpkin applique to its white background square. Lightweight fusible interfacing supports the block while you zigzag stitch around the applique.
What stitch should I use around the pumpkin appliques?
A zigzag stitch secures the raw applique edges and adds a decorative detail. An open-toe foot can make it easier to see the edge as you sew.
Can I use different colors for the pumpkins?
Absolutely. Traditional orange works beautifully, but rust, gold, cream, green, or even a mix of fall prints can give your pumpkin patch a completely different personality.
Where can I buy 5" fabric squares for this project?
Browse Sit n’ Sew Fabrics’ selection of 5" Squares, including the mixed orange and mixed white packs featured in this tutorial.
Recent Posts
-
Machine Embroidery Needles: Sizes, Types & How to Choose
Machine Embroidery Needle Guide Machine Embroidery Needles Explained: Sizes, Points & How to Cho …Sep 10th 2026 -
Scrappy Pumpkin Patch Wall Quilt Tutorial with 5" Squares
Free Fall Quilt Tutorial Scrappy Pumpkin Patch Wall Quilt Tutorial with 5" Squares Key Takeaways: …Sep 2nd 2026 -
12 Spooky-Cute Designs & Projects to Stitch
Halloween Embroidery Inspiration 12 Halloween Embroidery Ideas for Spooky-Cute Projects Key Takea …Aug 10th 2026