

Learn How To Sew a Leaf Block
It's fall, and for many of us, that means it's leaf season! Sew a leaf block that won't require raking and won't fade as the weather gets colder! Follow the tutorial below to learn how, and then keep reading for instructions on how to make a leaf table runner using your blocks,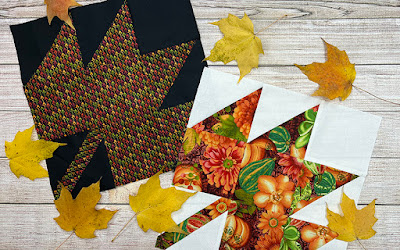
Looking for some fall-themed fat quarters? Check out our Fat Quarter bundle selection here.


Looking for some fall-themed fat quarters? Check out our Fat Quarter bundle selection here.

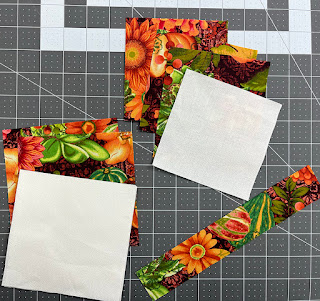
Cutting for One Leaf Block:
From leaf print:
(2) 5" squares
(3) 4-1/2" squares
(1) 1-1/2" x 8" piece
From background fabric:
(3) 5" squares
(3) 5" squares
(1) 4-1/2" square
Make a Leaf Runner!

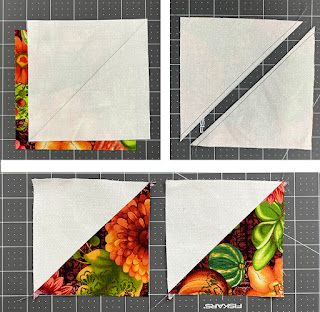
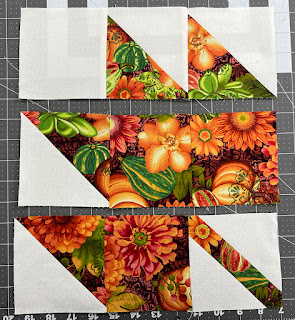
Step 1: Draw a diagonal line on the wrong side of (2) 5" background squares. Place a marked square right sides together with a 5" leaf print square. Stitch 1/4" on each side of the drawn line, cut on the line, and press units open. Square up to measure 4-1/2" square. Make (4) HST units.

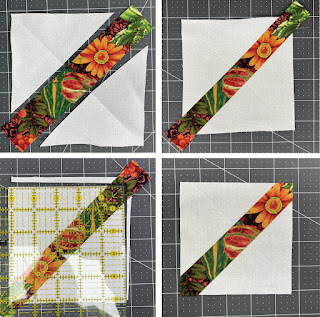
Step 2: To make the stem unit, cut the remaining 5" background square diagonally in half. Press each triangle in half along the long edge to mark the center point. Fold the 1-1/2" x 8" leaf print piece in half and press to mark the center point. Match center points and sew the triangles to the leaf print piece. Square up the unit to measure 4-1/2", centering the "stem" from corner to corner.

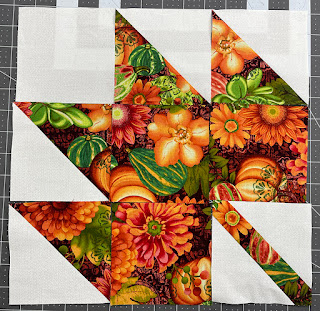
Step 3: Lay out the (4) HST units, (1) stem unit, (3) 4-1/2" leaf print squares and (1) 4-1/2" background square into (3) rows of (30, noting orientation. Sew into rows and join the rows to make (1) 12-1/2" square leaf block.


Sew 3 leaf blocks and turn them into a seasonal table runner
Measures 46" x 18"
You'll Need:
(3) 12" square leaf blocks
(3) 12" square leaf blocks
3/4 yard coordinating fabric for sashing, borders and binding
Cutting:
(2) 3-1/2" x 40-1/2" strips
(2) 3-1/2" x 18-1/2" strips
(2) 2-1/2" x 12-1/2" strips
(4) 2-1/4" x WOF strips for binding

Step 1 Lay out (3) leaf blocks (rotating as desired) with (2) 2-1/2" x 12-1/2" sashing strips. Sew blocks and strips together to make the runner center.
Step 2 Sew 3-1/2" x 40-1/2" border strips to opposite long sides of the runner. Sew 3-1/2" x 18-1/2" border strips to the short ends to complete the runner top.

Step 3 Layer the runner top with batting and backing. Baste the layers together and quilt as desired. Use the (4) 2-1/4" x WOF strips to bind the runner. Enjoy!
Oct 31st 2024
Recent Posts
-
Machine Embroidery Needles: Sizes, Types & How to Choose
Machine Embroidery Needle Guide Machine Embroidery Needles Explained: Sizes, Points & How to Cho …Sep 10th 2026 -
Scrappy Pumpkin Patch Wall Quilt Tutorial with 5" Squares
Free Fall Quilt Tutorial Scrappy Pumpkin Patch Wall Quilt Tutorial with 5" Squares Key Takeaways: …Sep 2nd 2026 -
12 Spooky-Cute Designs & Projects to Stitch
Halloween Embroidery Inspiration 12 Halloween Embroidery Ideas for Spooky-Cute Projects Key Takea …Aug 10th 2026