
Easy Baby Bargello Quilt Tutorial Using Fat Quarters
Fat Quarter Quilt Tutorial
How to Make an Easy Baby Bargello Quilt with Fat Quarters
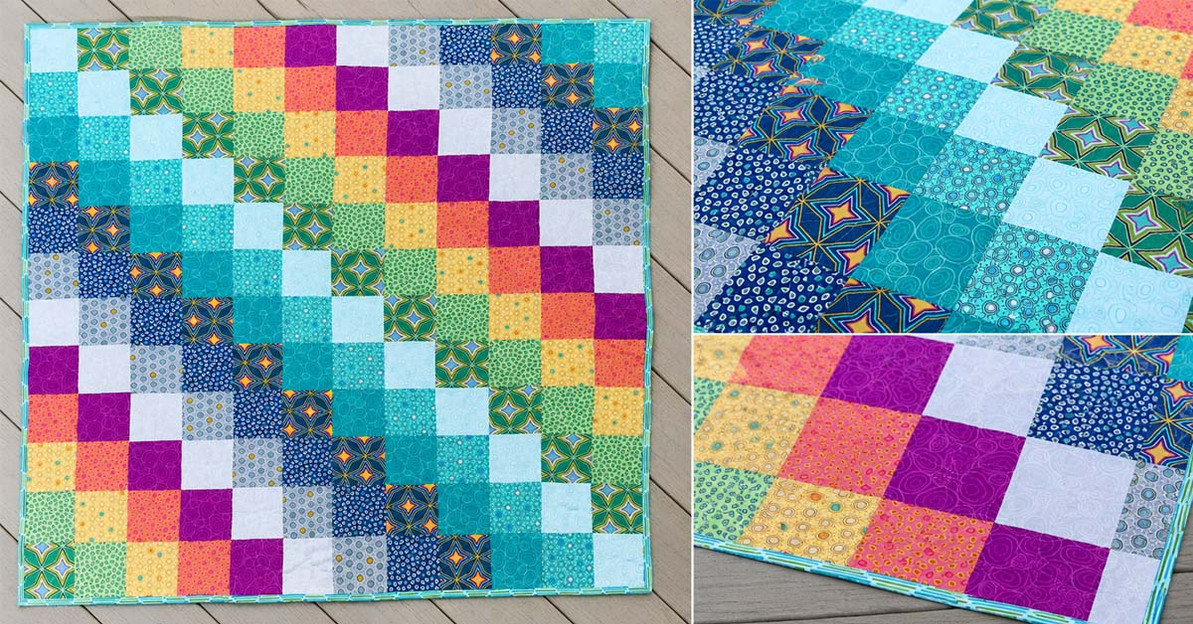
Key Takeaways: Make a colorful 42-1/2" square baby bargello quilt using 12 fat quarters and a time-saving strip-piecing technique. Instead of sewing individual squares together, you will create strip-set tubes, cut them into loops, and arrange the rows to form the flowing bargello design.
Have you ever wanted to make a bargello quilt? Now is your chance!
This technique creates a beautiful repeating pattern without requiring you to sew every individual square together. It is a fun, efficient method that makes the finished quilt look much more complicated than it really is.
This quilt is especially nice for a baby gift. It uses fat quarters, finishes at approximately 42-1/2" square, and goes together quickly. Win-win-win!

Jump to a Section
Choosing Fabric for Your Baby Bargello Quilt
I used the Nature Unfiltered Fat Quarter Bundle. It includes so many bright, cheerful prints and works beautifully for a baby girl or boy.
You need 12 fat quarters for the quilt top, so any fat quarter bundle with at least 12 prints can work. Choose fabrics with enough contrast to help the bargello pattern flow across the quilt.
Use our printable instructions as you sew: download the Baby Bargello Quilt Pattern.

Choose a Bundle for Your Bargello Quilt
Start with 12 coordinating fat quarters and create your own colorful version of this beginner-friendly baby quilt.
What You’ll Need
| Supply | Details |
|---|---|
| Fat Quarters | 12 coordinating fat quarters for the quilt top |
| Backing Fabric | Enough fabric to cover the finished 42-1/2" square quilt top with extra around the edges |
| Batting | A piece slightly larger than the finished quilt top |
| Binding | Five 2-1/4" x width-of-fabric strips |
| Basic Sewing Supplies | Sewing machine, thread, rotary cutter, quilting ruler, cutting mat, iron, ironing surface, and pins |
Cutting Instructions
From each of 12 fat quarters, cut:
Three 4" x width-of-fabric strips
Before cutting: Press the fat quarters and square the edges as needed. Accurate 4"-wide strips will help the rows line up correctly later.
Sew Along with the Video Tutorial
Keep the printable pattern nearby and watch the full Baby Bargello Quilt video for a closer look at each step.
Make the Baby Bargello Quilt
Step 1: Arrange the Fabric Strips
Choose an order for your prints. I used a rainbow effect, but you can arrange the fabrics from light to dark, alternate warm and cool colors, or create your own repeating sequence.
Sort the strips into three identical piles, beginning with the fabric that will appear in the upper-left corner of the quilt.

Step 2: Sew the Strips into Pairs
Beginning with the first pile, sew the strips together lengthwise in pairs using an accurate 1/4" seam allowance.

Step 3: Make Three Strip Sets
Join the pairs together in the selected fabric order to make one 12-piece strip set. Repeat the process to make three identical strip sets.

Step 4: Press the Strip Sets
Press the seam allowances of Strip Set #1 toward the top. Press the seam allowances of Strip Set #2 toward the bottom.
Cut the third strip set in half to make two approximately 10"-wide segments. Press the seam allowances of one half toward the top and the seam allowances of the second half toward the bottom.
Why alternate the pressing direction? The opposing seam allowances will nest together when the vertical rows are joined, making it easier to match the seams accurately.
Step 5: Turn the Strip Sets into Tubes
Working with Strip Set #1, sew the top and bottom strips together lengthwise to form a fabric tube. Repeat with the half strip set that was pressed toward the top.
Repeat the process with Strip Set #2 and the remaining half strip set.

Step 6: Cut the Tubes into Loops
Lay one fabric tube flat on your cutting mat and square up one end. Flip the tube over as needed and crosscut it into 4"-wide loops.
From the #1 strip set and its matching half set, cut a total of six loops and place them in one pile. Repeat with the #2 strip set and its matching half set to make six additional loops.


Here is what the finished loops look like. Aren’t they pretty?

Create Your Own Color Sequence
Choose a coordinated fat quarter bundle or mix individual fat quarters to make the bargello design your own.
Step 7: Open and Arrange the Loops
Refer to the downloaded pattern or the finished quilt image above. Take one #1 loop and remove the stitching between the top and bottom fabrics for the left-hand vertical row.
Next, take one #2 loop and remove the stitching between the fabrics that will become the top and bottom of the second vertical row from the left.
Continue opening the loops in the correct locations, alternating between the #1 and #2 piles. Each loop will become one vertical row.


Step 8: Lay Out the Vertical Rows
Lay out all 12 vertical rows, making sure the bargello pattern flows smoothly from one row to the next. The photograph below shows six of the rows during the layout process.

Step 9: Sew the Rows into Pairs
Sew the vertical rows together in pairs. Pin at each horizontal seam and make sure the opposing seam allowances nest before sewing.


Step 10: Complete the Quilt Top
Continue joining the row pairs until all 12 vertical rows are sewn together. Press the finished quilt top carefully. That’s it—your Baby Bargello quilt top is complete!
Finishing the Quilt
Layer the backing fabric, batting, and quilt top. Baste the three layers together using your preferred method, and machine quilt as desired.
For the sample quilt, I used a free-motion quilting foot and stitched a wavy line along all the seams and down the center of each block row.
After quilting, trim the backing and batting even with the quilt top.

Binding: Cut five 2-1/4" x width-of-fabric strips. Join the strips end to end, press the binding in half lengthwise, and attach it to the quilt using your preferred binding method.
Ready to Make a Baby Bargello Quilt?
Pick a colorful fat quarter bundle, download the pattern, and watch the video tutorial as the flowing bargello design comes together.
Baby Bargello Quilt FAQ
Is a bargello quilt difficult to make?
This version is approachable for a confident beginner who can sew an accurate 1/4" seam. The strip-piecing method creates the repeating design without requiring you to sew hundreds of individual squares together.
How many fat quarters do I need?
You need 12 fat quarters for the quilt top. Each fat quarter is cut into three 4" x width-of-fabric strips.
What size is the finished Baby Bargello quilt?
The finished quilt measures approximately 42-1/2" square, making it a useful size for a baby quilt, stroller quilt, or colorful lap quilt.
How should I arrange the fabrics?
Arrange the fabrics in a sequence that creates visible movement. A rainbow arrangement, light-to-dark progression, or alternating warm and cool colors can all work well.
Where can I download the Baby Bargello Quilt pattern?
You can download the printable Baby Bargello Quilt Pattern here.
Is there a video tutorial for this quilt?
Yes. You can watch the full Baby Bargello Quilt video tutorial on YouTube.
Where can I find fat quarters for this quilt?
Browse the available fat quarters and fat quarter bundles at Sit n’ Sew Fabrics.
Recent Posts
-
Machine Embroidery Needles: Sizes, Types & How to Choose
Machine Embroidery Needle Guide Machine Embroidery Needles Explained: Sizes, Points & How to Cho …Sep 10th 2026 -
Scrappy Pumpkin Patch Wall Quilt Tutorial with 5" Squares
Free Fall Quilt Tutorial Scrappy Pumpkin Patch Wall Quilt Tutorial with 5" Squares Key Takeaways: …Sep 2nd 2026 -
12 Spooky-Cute Designs & Projects to Stitch
Halloween Embroidery Inspiration 12 Halloween Embroidery Ideas for Spooky-Cute Projects Key Takea …Aug 10th 2026