
A Fruity Fun Fat Quarter Project
Join me to turn a fat quarter bundle into a fun and fast-to-finish sewing project!
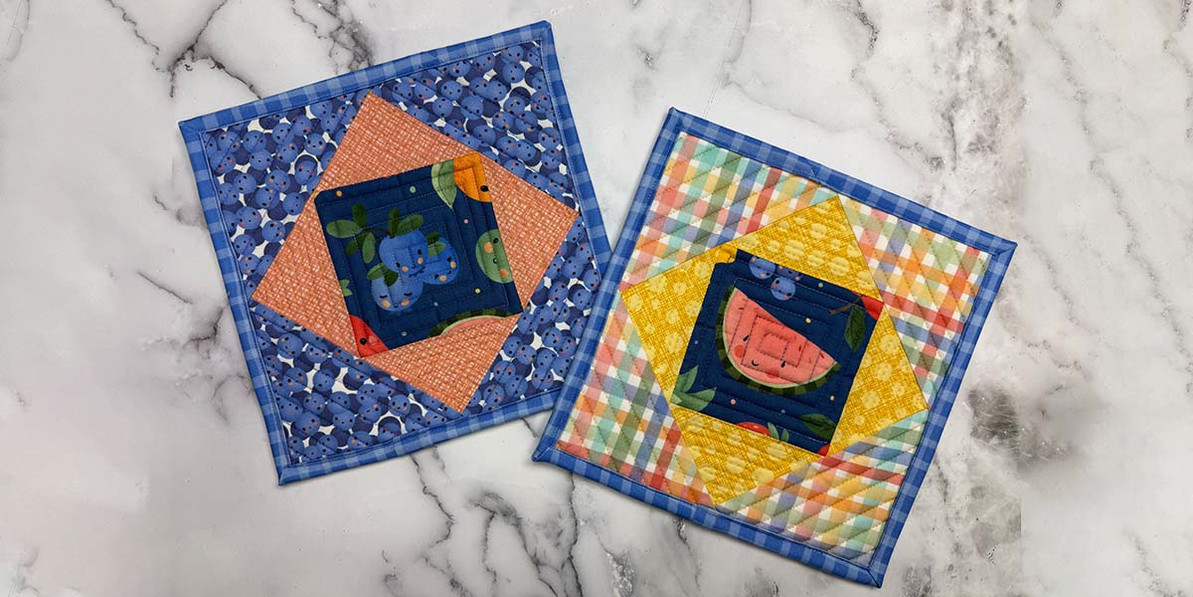
A cheerful square-in-a-square potholder project using a fat quarter bundle you’ll want to fussy cut again and again.

When I saw the colorful Fruity Fun FQ bundle - how adorable are those smiling fruits?!?! - I knew they'd be perfect for a couple square-in-a-square potholders. They'll be so cheery in the kitchen! You can choose your favorite bundle here .

Fabric Placement (Quick Tip)
Let's talk fabric placement - you want contrast between the different sections of the placemat to help the design shine. The center squares are dark and busy, so choose a lighter and plainer print for the first round of triangles. Because these inner triangles are quieter, you can choose a bolder print for the outer triangles - just make sure it contrasts with the inner triangles.

Cutting
(for 1 placemat)

Here are my fussy-cut squares for potholder centers.

Peach tonal:
(1) 9-1/2" square (backing)
(2) 4-1/4" squares, cut diagonally in half once
(1) 9-1/2" square (backing)
(2) 4-1/4" squares, cut diagonally in half once
Blueberry print:
(2) 5-1/2" squares, cut diagonally in half once
(2) 5-1/2" squares, cut diagonally in half once
Blue plaid:
(2) 2-1/4" x 21" binding strips
(2) 2-1/4" x 21" binding strips
Make the Potholder
Step 1: Finger press triangles and square to mark center points. Aligning center points, sew peach triangles to opposite sides of the center square. Press open and trim side triangle tips even with the square edges.

Tip: Those triangle tips like to shift when you're sewing. Make sure to pin along the length of the triangle so they don't move.

Step 2: Add the remaining peach triangles to opposite sides. Trimming: After the remaining peach triangles are added, square up the block center to 1/4" past the blue square points. This will create a block center measuring approximately 6" square.

Step 3: Add (2) blueberry triangles to opposite sides of the block center, matching the centers of the triangles with the blue square points. Trim triangle tips.

Tip: Sew these triangles on with the square side on top - this allows you to make sure your stitch line is just past the existing seam, creating crisp points.

Step 3: Add the remaining blueberry triangles to opposite sides of the block center, matching the centers of the triangles with the blue square points. Do not trim the finished pot holder top - we'll do that after machine quilting.

Step 4: Layer the potholder top with 2 layers of batting and (1) 9-1/2" backing square. Baste layers together. Choose contrasting thread to quilt the potholder. I picked 2 different thread colors to blend with my fabrics: Goldenrod #668 and Blue Lagoon #508. The variegated Blue Lagoon thread matches these fabrics so well!

Step 5: Square up quilted pot holder 1/2" past peach points and use the (2) 2-1/4" x 21" blue plaid strips to bind. (Find binding instructions here.)

Here's the finished potholder!

And my second one!

And just like that, you have a bright (and useful) sewing project complete - and that fruit fabric is so cute, I can't wait to fussy cut more squares to make additional potholders.
Jan 8th 2026
Recent Posts
-
Machine Embroidery Needles: Sizes, Types & How to Choose
Machine Embroidery Needle Guide Machine Embroidery Needles Explained: Sizes, Points & How to Cho …Sep 10th 2026 -
Scrappy Pumpkin Patch Wall Quilt Tutorial with 5" Squares
Free Fall Quilt Tutorial Scrappy Pumpkin Patch Wall Quilt Tutorial with 5" Squares Key Takeaways: …Sep 2nd 2026 -
12 Spooky-Cute Designs & Projects to Stitch
Halloween Embroidery Inspiration 12 Halloween Embroidery Ideas for Spooky-Cute Projects Key Takea …Aug 10th 2026