
Level Up Your Lettering: 3 Secrets to Crisp, Clean Embroidered Text
Hello, fellow stitchers!
We’ve all been there. You spend hours creating a beautiful embroidery project—a baby blanket, a kitchen towel, a polo shirt—and the final step is to add a name, a date, or a monogram. You pick a font, shrink it down, press start, and… you’re left with a blobby, unreadable mess. What should have been the perfect finishing touch ends up ruining the whole piece.
It’s one of the most frustrating experiences in machine embroidery. But I’m here to tell you that it’s almost always preventable. As someone who has stitched thousands of names and monograms, I’ve learned that achieving crisp, clear lettering isn’t about luck; it’s about technique.
Today, I’m sharing three of my most essential secrets to transform your text from an afterthought into a stunning, professional feature.
Secret #1: Choose Your Font Wisely
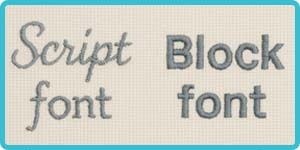
The single biggest mistake embroiderers make is thinking any font can become an embroidery font. Grabbing a delicate, script-like font from your computer’s word processor and expecting it to stitch out at half an inch tall is a recipe for disaster.
-
The Problem: Ink is not thread. A font designed for printing (a TrueType Font or TTF) can have razor-thin lines and complex curves that are impossible to replicate with a needle and thread. When stitched, those thin lines disappear and the curves become a jumble of stitches.
-
The Fix: Use fonts that have been specifically digitized for embroidery. These fonts are built stitch by stitch by a digitizer who understands how thread behaves. For small text (under a half-inch), look for simple, clean "block" or sans-serif fonts. They are intentionally designed without tiny, delicate parts (serifs) that turn to mush when stitched small.
Secret #2: Embrace Your Underlay Stitching

If you look closely at a professionally digitized font, you'll see a light layer of stitches underneath the final, beautiful satin stitches. This is called underlay, and it is your unseen best friend.
-
The Problem: Without a proper foundation, your main stitches can sink into the fabric (especially on knits or towels), shift around, and lack definition. This leads to gapping and fuzzy-looking letters. Many people turn underlay off in their software to save a few seconds, which is a critical error.
-
The Fix: Think of underlay as the primer you use before painting a wall. It stabilizes the fabric and gives the top stitches a smooth, raised surface to grab onto. For small lettering, a "center-run" or "edge-run" underlay is often perfect. It tacks down the fabric exactly where the stitches will go, ensuring every stitch has a purpose and a place. Never turn it off!
Secret #3: Stop Abusing the "Shrink Ray"

You found the perfect 2-inch tall font, but you need it to be 0.5 inches. It’s so easy to just select the design on your machine or in your software and shrink it down by 75%, right? Wrong.
-
The Problem: When you shrink a pre-digitized design, you are cramming the exact same number of stitches into a much smaller area. The stitch density goes through the roof. This perforates the fabric, creates a hard, bullet-like feel, and often causes thread to bunch up and break your needle.
-
The Fix: Never resize a digitized font by more than 10-15%. If you need a font at a specific small size, you must buy a font that was digitized at that size. Reputable digitizers sell their alphabet sets in multiple sizes (0.5", 1", 2", etc.) because they have completely re-mapped the stitches, underlay, and density for each one. Respect the digitizer’s work and use the font at its intended size.
The Pro Power-Up: Your Needle & Thread Toolkit
Ready for the ultimate game-changer? If you are serious about pristine, tiny lettering, you need to adjust your tools.
Your standard embroidery setup is likely a size or needle and standard wt. thread. This is perfect for most designs, but it can be too clunky for delicate text.
-
The Pro Needle: Switch to a smaller needle, like a or even a embroidery needle. It creates a smaller hole in the fabric, allowing for more precise placement of stitches in tight spaces.
-
The Pro Thread: Switch to a thinner thread. A wt. embroidery thread is significantly finer than standard wt. It allows the details of the letters to emerge without becoming muddy or thick.
The combination of a smaller needle and finer thread is the secret weapon behind those impossibly crisp monograms you see on high-end items. It’s a small change that makes a world of difference.
By choosing the right font, using proper underlay, and respecting the design’s original size, you’ll take the guesswork out of lettering for good.
Happy stitching!
Ready to put these tips to the test?
Explore our fantastic collection of high-quality
Recent Posts
-

Diamonds Galore!
Sit n' Sew Fabrics • Quilt Tips Let’s Talk Diamonds! Diamond quilts are beautiful to look at, an …Mar 6th 2026 -
")
Essential Tools for Embroidery Beginners (...and Novices)
Embroidery Troubleshooting Why Your Machine Embroidery Projects Aren’t Going as Smoothly — and the …Feb 25th 2026 -

Perfect Half Square Triangles
Sit n’ Sew Fabrics • Quilting Tutorial Half-Square Triangles (HSTs): 3 Ways + 1 to Skip …Feb 19th 2026